

Surface Hub 2s 85 Zoll Preis
This browser is no longer supported.
Upgrade to Microsoft Border to take advantage of the latest features, security updates, and technical support.
Install and mountain Surface Hub 2S 85"
This article provides supporting guidance for physically installing Microsoft Surface Hub 2S 85" in commercial environments.
Unboxing video
- Earlier you begin, please review Microsoft Surface Hub 2S 85" Unboxing and Gear up video:
Follow all safety precautions
Warning
Treatment and site prep
- The device is very heavy. To reduce the hazard of personal injury, death, or damage to the device due to its size and weight, it is of import to keep the device upright.
- Before moving the device to the place where it will be installed, survey the site to determine how to safely move information technology to the location where information technology will be unpacked and mounted.
- Always use at least two people for unpacking and installation.
- In one case the device is unpacked, it should be mounted immediately, and then the mounting organization should be in identify before unpacking. If you're mounting onto a rolling stand, lock or block the wheels of the stand up before unpacking.
- To avoid tripping hazards, keep the assembly surface area clear of packing materials.
Of import
Before proceeding, review the additional safety information listed in Appendix A below.
1. Remove outer packaging materials
- Remove and recycle outer comprehend.
- Cut four (four) plastic straps.
- Open and remove the 6 (six) clips from the ends.
- Remove lid and then lift and remove front and dorsum panels.
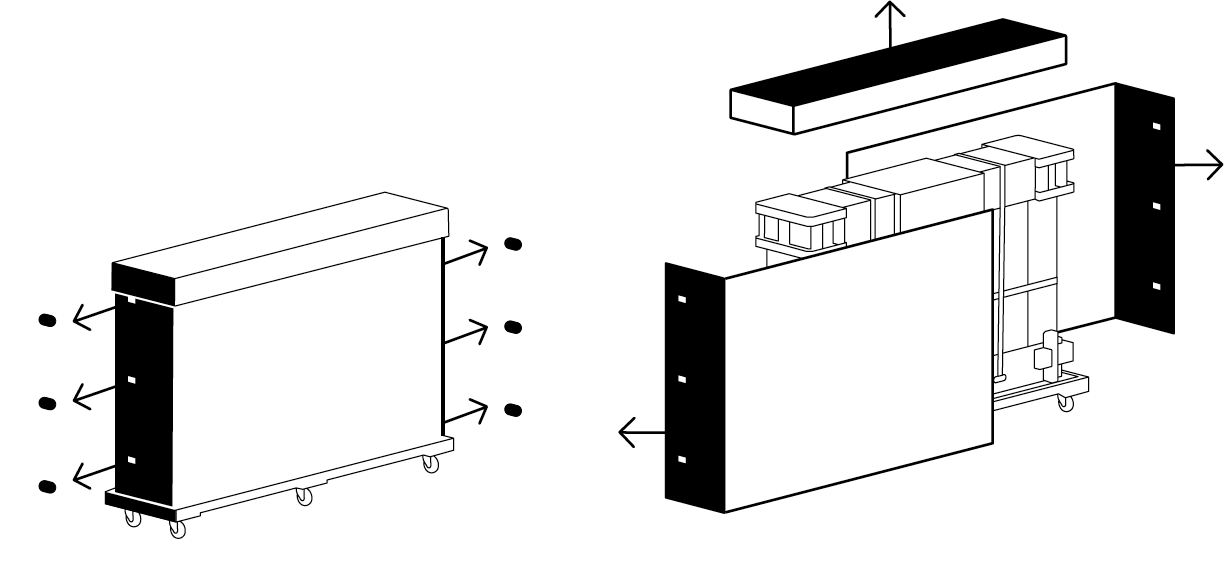
2. Remove blackness outer packaging cream
- Remove black corner cream pieces (iv).
- Remove black eye cream support.
Caution
Do not remove any white foam, strapping or packaging materials until the Hub 2S is adjacent to the cart or wall mount on which information technology will be placed. Boosted strapping materials are provided in the modest box located under the hand screw knobs on the back side of the package. Original or replacement strapping materials must be in place earlier moving and particularly earlier rotating the device and its protective package
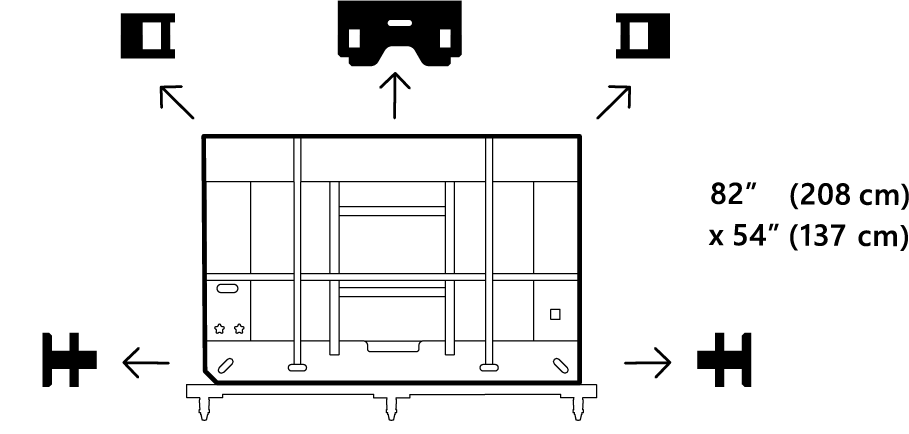
3. Remove inner packaging frame from pallet
- Movement pallet assembly to lift location.
- Lock bike brakes (4).
- Slide inner packaging off pallet.
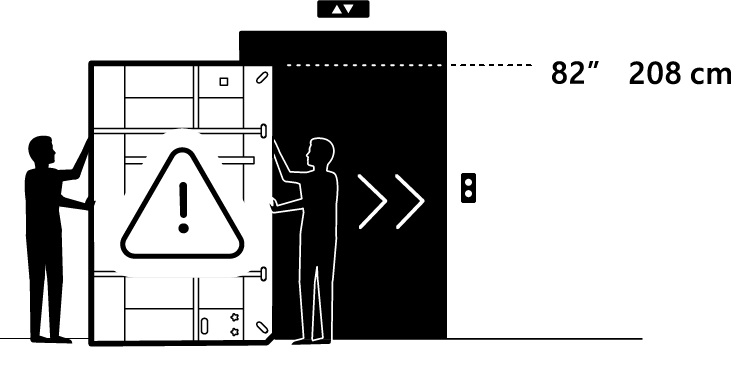
4. Rotate packaging frame to fit lift
- Rotate frame to fit lift
- Rotate on beveled end of inner frame and slide into the elevator.
Tip
The wheeled pallet is custom fit to the inner frame packaging footprint and can exist used throughout the installation site commitment process. Inner wood frame end piece has nylon skid plates.
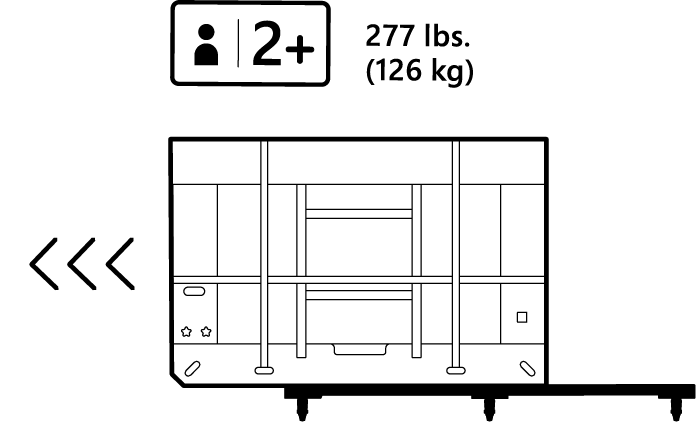
five. Remove from lift
- Slide out of elevator
- Lock wheel brakes (x4).
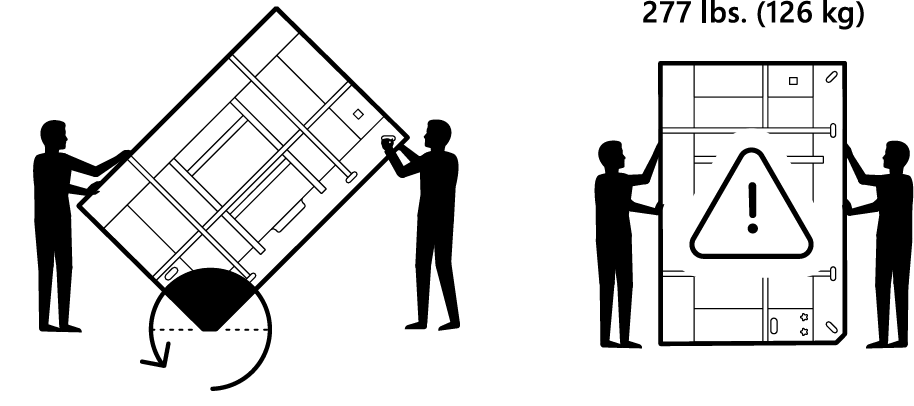
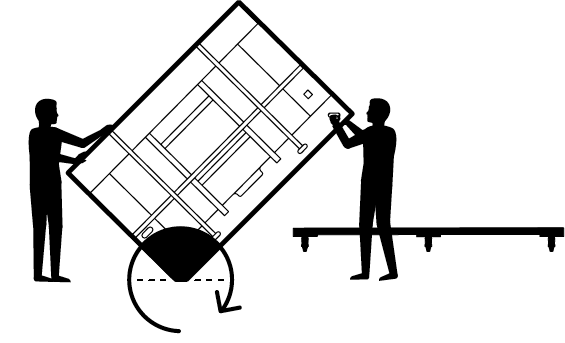
6. Identify Surface Hub 85" back on pallet
- Using askew end, rotate back onto pallet.
- Unlock wheel brakes (x4).
- Move product to location of wall or cart mount.
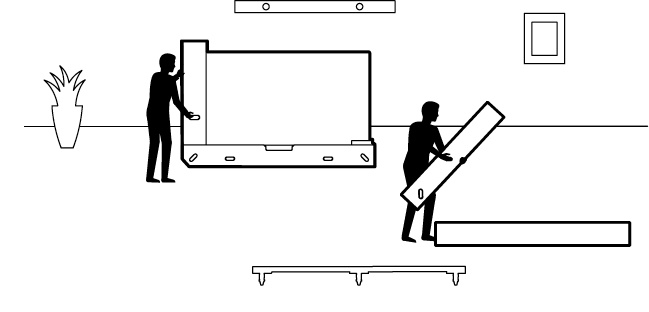
vii. Place Surface Hub 85" on Wall Mount or Cart
-
Place Hub 2S in front of wall mount or cart.
-
Lock bicycle brakes (x4).
-
Slide inner packaging off pallet.
-
Cut the 3 plastic straps.
-
Remove chapeau.
-
Remove white cream pieces.
-
Remove Welcome Kit.
-
Remove finish slice past lifting vertically.
-
Remove forest terminate pieces past the four hand knobs screws on the forest base.
Caution
Do not leave Hub 2S 85" unattended. An boosted person is needed to hold device upright. Once end pieces are removed, a minimum of one person needs to maintain contact with the Hub 2S until placement on wall mount or cart is completed.
-
Lift plywood end piece up and dorsum.
-
Remove crash-land label from back.
-
Lift the Hub 2S from the lower tray and place on cart or wall mount.
Note
Following the cart or wall mount manufactures instructions, prepare the mounting organisation prior to removing the Hub 2S from its inner packaging tray.
Tip
When grasping the Hub 2S, note the hand hold cut outs in the lower foam. Care must be taken care with the superlative paw not to grasp the device where the speakers are located. Graphic on the ends of the device comprehend provide full general speaker location.
-
Loosen elastic tension clips (x2).
-
Remove cloth embrace.
-
Annotation locations for placement of pens (x2), camera, and ability cord.
-
Attach pens (x2), photographic camera, and ability string.
-
Remove cling labels (x4).
-
Press the ability push on lower right. Installation is now complete.
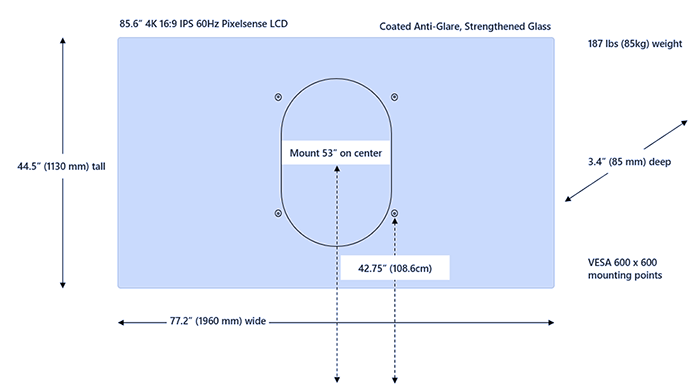
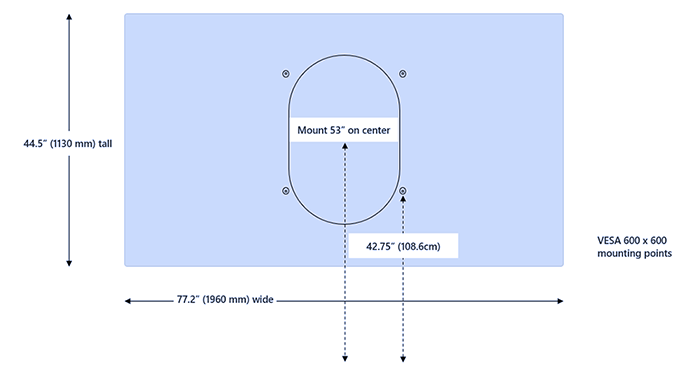
Mounting Surface Hub 2S 85"
The Surface Hub 2S 85" uses a 600 ten 600 VESA mountain blueprint. As shown in the post-obit image, Microsoft has partnered with Steelcase to create mounting options compatible with the Surface Hub 2S 85" unique blueprint.
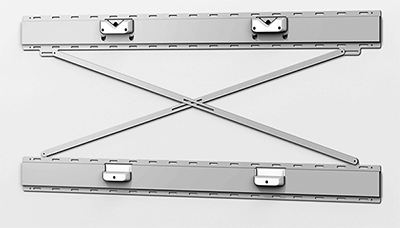
Mounting dimensions
If using other (not-Steelcase) mounting options, you will need spacers to business relationship for the compute enclosure on the back of the device. Spacers and other certified accessories are available from Salamander Designs.
Supplemental Strapping Kit
An additional set of inner packaging strapping materials can be found in the kit attached at the back, lower right.
Appendix A: Boosted condom information
Alarm
Heavy object/ergonomic lifting
The device is very heavy. To reduce the risk of lifting-related injuries, decease, or damage to the device, nosotros recommend that a minimum of two or more people lift the device. It is important to apply proper lifting posture when lifting and/or moving the device. Apply practiced ergonomic lifting practices, including but non limited to:
- Plan ahead. Make certain the lifting squad agrees on the programme.
- Determine if you can lift the unit. Is it too heavy or likewise awkward?
- Decide if yous need lifting aid.
- Check your surroundings for obstructions and slippery surfaces.
- Lift with your legs, not your back.
- Curve at your knees, keeping the back straight.
- Keep the unit of measurement close to your torso.
- Center your torso over the unit. Keep the feet about shoulder width apart.
- Lift straight up smoothly.
- Go on your torso straight; do not twist while lifting or after the load is lifted
Alert
Proper mounting
The device is heavy and attaches to a cart or wall mountain. To reduce the risk of injury, decease, or damage to the device:
- Follow all instructions provided by the cart or wall mount manufacturer.
- Ensure the proposed mounting system volition support the weight of this device.
- Simply utilize the mounting hardware provided with mounting the organization.
- Ensure all screws are deeply tightened according to the manufacturer's instructions.
- Exercise not release the device until you lot are certain device is fully engaged with mounting system attachment points.
- Microsoft recommends using carts or wall mounting systems designed for employ with your device. Microsoft is not responsible for any damage, injuries, or death acquired by the use of other mounting systems.
Warning
Unseen hazards in walls or other mounting surfaces
Walls and other mounting surfaces may contain electrical wires, gas lines, and other unseen hazards or obstacles. Cutting or drilling into an unseen hazard may cause serious personal injury or expiry. It is the installer'due south responsibility to locate unseen hazards prior to and to avoid these hazards during installation. Appraise the mounting environment and ever make certain at that place are no unseen hazards in the wall or other mounting surface prior to drilling and/or cut.
Warning
Tip hazard
To avoid risk of personal injury, death, or damage to a cart/stand-mounted device when it is moved:
- Only use a cart/stand up that is compatible with this device.
- Follow all instructions provided by the cart/stand manufacturer for moving or relocating a stand-mounted device.
- Exercise not hang or place heavy objects from the device or on the cart/stand.
- Disconnect the ability cord and other cables as needed prior to moving the cart/stand-mounted device. Use caution and move slowly when moving cart/stand-mounted device. Follow the cart/stand up manufacturer's instructions for moving or relocating the stand.
- Utilise caution when transporting a cart/stand up-mounted device up or down ramps. Never exit a cart/stand-mounted device unattended on or virtually a ramp.
- Only adults should motility the cart/stand-mounted device.
Caution
Touch-screen glass
The affect screen on the device, similar most affect screens, is fabricated of glass. The glass tin suspension if the device is dropped or receives a significant impact. To reduce the take a chance of personal injury, avoid touching the screen if the glass is cleaved, chipped or cracked and adapt to have the screen replaced. A cracked or chipped touch screen caused by misuse or abuse of your device is not covered under the production'southward express warranty.
Warning
Proper installation
To avoid hazards related to improper device installation, installation must be performed by people who accept read and understand the installation instruction prior to beginning work. If you do non have the necessary equipment or expertise, or if you are uncertain the mounting surface tin properly support consult a professional person installer.
More information
- Steelcase Roam Collection
- Salamander Designs
Feedback
Submit and view feedback for
Source: https://docs.microsoft.com/en-us/surface-hub/surface-hub-2s-85-install-mount
Posted by: torresthereenewhe.blogspot.com
0 Response to "Surface Hub 2s 85 Zoll Preis"
Post a Comment