

How To Use A Laser Level Youtube
Contrary to what many people might believe, light amplification by stimulated emission of radiation levels are not simply useful for professional construction projects. Information technology wouldn't be wrong to country that light amplification by stimulated emission of radiation levels take a universal utility. Y'all could utilise them for hanging wallpapers, installing a long shelf, edifice a cabinet or deck and putting up tile for your kitchen'due south backsplash. What'south more, you lot could besides use laser levels to hang pictures in your home. Unbelievable? Let me teach you how to use a laser level for hanging pictures.

Advantages of Using Laser Levels to Hang Pictures?
Free your hand. Since y'all have the light amplification by stimulated emission of radiation level mounted on the wall or on a tripod, one paw of you will be free to hammer the nails where you lot'd eventually hang the frames Allow more possibilities. Laser levels also permit you hang pictures at an bending Marker hanger location. If you're going to hang a total row of pictures of identical sizes on the wall, the level will also exist helpful to mark the hanger location in addition to mark the frame location
Steps of Using A Laser Level for Hanging Pictures?
Footstep # 1: Get all the tools yous may need
As well the laser level, yous volition need a whole host of tools to get the task done. Make sure you take it BEFORE you showtime working on the projection. Otherwise, equally people with feel might testify, at that place's nothing more frustrating than not finding the desired tool midway through.
Below are the tools you should have …
- Measuring tape
- Hammer
- Drill
- Drive Bits and Drill Bits
- Pencil
- Blue Tape

Step # 2: Make up one's mind the Hanging Place
- Offset things first, you lot need to decide the exact place where you lot desire to place the movie.
- Once you've done that, get a hammer, a nail, and a measuring tape.
- Now use the measuring tape to measure the distance from the floor to the spot in a straight line where y'all want to identify the picture.
- Once you've measured information technology, note downwardly the distance. Next, put the nail on the wall and place the frame.


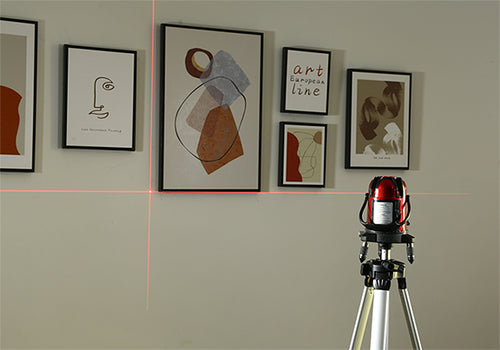
Footstep # three: Get the laser level
In the previous pace, you lot noted down the distance from the floor to the point where you put the frame. As y'all'd have guessed, it would exist difficult repeating the aforementioned process with other frames. That's where a laser level will come to your rescue.
Use a cocky-leveling laser level, all you demand to practice is to gear up it upward on a tripod for it to showtime giving accurate signals.
Stride # four: Use the laser level
- Take the leveled laser level, and bespeak it at the point where y'all set up the first frame.
- Once the laser's dot meets that point, turn the level effectually towards the other wall where you want to hang the picture.
- Mark the angle on the wall with a chalk. For every new pic, you've to repeat this procedure.
Step # 5: Terminal Step
- Once you have drawn a mark, have out the hammer and using it, hammer a boom into the verbal spot which you had marked before.
- After, secure the frame of the picture on the nail and by using the laser, align its superlative.

Reference: https://laserlevelguru.com/laser-level-for-hanging-pictures/
Related Videos
Source: https://www.dekotools.com/blogs/how-to/how-to-use-a-laser-level-to-hang-pictures
Posted by: torresthereenewhe.blogspot.com
0 Response to "How To Use A Laser Level Youtube"
Post a Comment