

Fishtail Braids : 10 Steps (with Pictures) - torresthereenewhe
Introduction: Fishtail Braids
Fishtail braids own an flowery look about them because they'ray made with small sections of whiske, but they're not as awkward to make over as you might think! Skyward until now you have knowledgeable every last about trey-strand braids, and now it's time to learn how to make a two-strand braid.

In this moral, you'll learn the fishtail technique and and so flush it up into a unadulterated title.

This Instructable is part of my beginner braids series. If you like this lesson, try the rest!
- Whiske Braiding for Absolute Beginners
- Easy Coif with Two Small Braids
- Braid Your Hair Without Superficial
- French Tress Fundamentals
- Dutch Pigtail Braids
- Crown Braid
- Waterfall Braid
- Fishtail Braids (this lesson)
- Well-stacked Braids
- Lasso Twist Hairstyle
To keep in the lead with what I'm working on, follow Maine connected YouTube, Instagram, Twitter, Pinterest, and subscribe to my newssheet.
Supplies
To experience started learning to braid, you really just deman some hair, a mirror, and dexterity in both hands. Everything else here clean enhances your results!
- Brush
- Comb
- Hair elastics
- Bobby pins
- Duck flyer clips
- Dry shampoo (or cook your own)
- Hairspray
- Styling paste
- Conditioning oil
As an Amazon Associate I earn from qualifying purchases you make using my associate links.
Step 1: Simple Side Ponytail
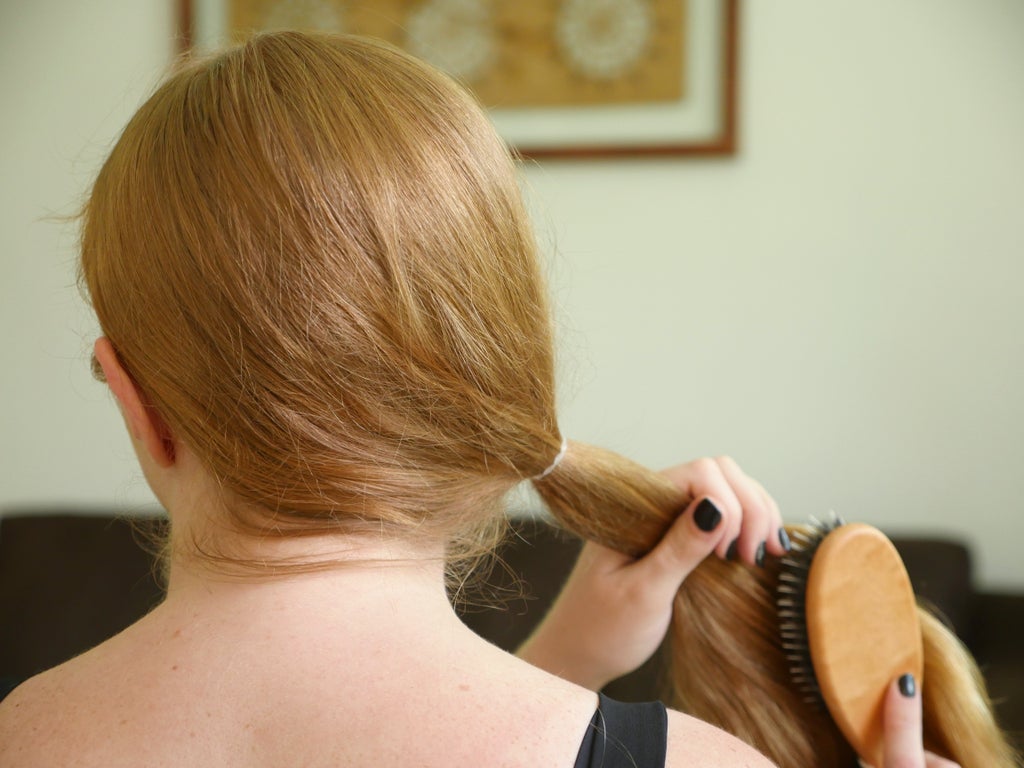
Begin by smoothing your pilus into a side ponytail at the base of your neck (doesn't matter which pull). If your hair isn't long enough or results in a very short ponytail, use a smaller part of hairsbreadth as an alternative, such as the front side incision used in the first lessons.

Brush the ponytail to remove any tangles, then divide it into two sections of about the aforesaid thickness.
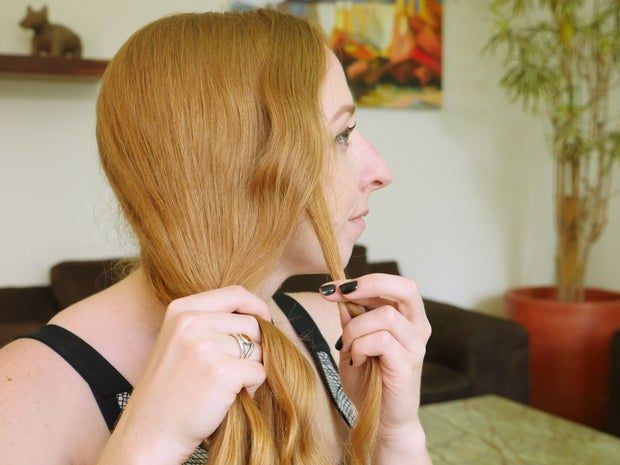
Step 2: Double cross Over a Wee Surgical incision

Separate a small department of hair from the extraneous of one of the halves. The section should be about the diameter of a pencil.


Cross this pocket-size section over its neighbour to the far half segment, and incorporate IT there.
Step 3: Over again From the Other Side


At present it's the other broadside's move around! Separate a pencil-sized section from the outer edge of the opposite half, and cross IT over the preceding section to integrate information technology with the first half.

Smooth both sections aside hand or with a brush. Getting started with a fishtail is the toughest part, so don't get yourself down if it takes a few tries to elevate and running!
Step 4: Retell From the First Side


Ready to repeat? Pull a slender section from the side you started with, and crown of thorns it over the middle to the opposing slope, and integrated IT into that half.

Step 5: And Then the Second


Are you getting a sense of the pattern? Separate a small section from the opposing half and cross information technology over the center to meet it's new plate along the another side. Follow information technology, your twist is about to showtime looking majorly picture!
Step 6: Restate Down the Line

Continue crossing small sections from one half to the other, alternating sides, until you run out of hair.

Snug the braid with a small elastic.

Gently pull the plait apart to make up a Fuller appearance. You did it! Did you stick the hang of the hand motions? IT can take a bit of practise, so feel free to restate this braid several multiplication before moving on.
Tone 7: Starting Without a Ponytail


Now that you've got the hang of the fishtail technique, it's fourth dimension to level it up into a more complete hairstyle! Start at one side as before, only hop on the ponytail. Divide your tomentum into ii flatbottomed sections, where the dividing line extends from the drown of your head to rump the ear.


Break short a small section from the front half, and sweep it over to unite with the back fractional.


Likewise grab a small section from the back half and cross IT over to join the front half. Remember that the 1st some stitches are the trickiest, so rest if you arrive thwarted trying to keep all those pieces in emplacement with appropriate stress, then try again!
Step 8: Criss Cross

Grab another small piece from the front half and cross it over to join the back half, and repeat with a small section from the hind crossing o'er to juncture the foremost. Try to keep the whole pleach low and close to your head. Remember that it's forever easy to pull round looser after you're polished, so improve to err happening the side of tight!

Step 9: Flipping It Over

Repeat the fishtail braid sectioning and crossing down the length of your hair.

At a convinced sharpen you may find information technology more comfortable to interchange the pleach over and complete it "inside unstylish" by crossing the sections under the middle before connexion the opposite lateral.

Step 10: You Did Information technology!
Tie off your braid with an elastic and gently pull the lace separated to adjust its shape and intensity, then show it dispatch! I find it easiest to do this braid over-the-articulatio humeri, but Eastern Samoa you gain more experience (and arm muscles), you pot try fishtail braids at the back of your foreland and other configurations.
This Instructable is part of my beginner braids series. If you like this lesson, try the respite!
- Hair Braiding for Unconditioned Beginners
- Relaxed Hairstyle with Two Small Braids
- Braid Your Hair Without Look
- French Braid Fundamentals
- European country Pigtail Braids
- Crown Braid
- Waterfall Braid
- Fishtail Braids (this lesson)
- Stacked Braids
- Rope Twist Hairstyle
6 Citizenry Ready-made This Project!
Recommendations
Source: https://www.instructables.com/Fishtail-Braids/
Posted by: torresthereenewhe.blogspot.com
0 Response to "Fishtail Braids : 10 Steps (with Pictures) - torresthereenewhe"
Post a Comment